The Battle for Hardware

There is a battle going on right now, and this one is not being fought with code. For years, the big tech fights were about software: who had the best search engine, the best app, the best cloud service, the best algorithm.

Today everyone is fighting over chips: who can build them, buy them, and run the biggest AI models on them without going broke. NVIDIA and Apple are both in this, but from completely different angles, and looking at why explains a lot about where AI is actually going to be run.

Chips Are the New Gold

Every AI company hits the same wall: you need GPUs, and there are not enough of them. Training a big model can cost hundreds of millions of dollars in compute alone, and running one for millions of users is not a cheap task either. Who controls the chip supply controls how fast everyone else can move, especially when a single top-end server costs more than a house and takes months to actually get. That’s basically why NVIDIA became one of the most valuable companies almost overnight, and why Apple is quietly playing its own version of the same game.

NVIDIA: originally for gaming and visual computing

NVIDIA did not just build fast chips, it built a trap that’s hard to leave. Its software platform, CUDA, has been around since 2007, and nearly every AI tool out there, PyTorch, TensorFlow, is built to run on it. This represent almost twenty years of tooling and habits that competitors like AMD are still trying to catch up to. You could design a chip that beats NVIDIA on paper, but getting the whole industry to switch is a much bigger problem.

Chips like the GB10 and the newer Blackwell series have made NVIDIA the default choice for anyone training or running large models, which means it also gets to set the price. Its own CEO has said the quiet part out loud: they’re not just selling chips anymore, they are selling entire “AI factories”, chips, networking, and software bundled together so leaving becomes painful. And even NVIDIA does not fully control its own supply chain: almost every advanced AI chip in the world gets made by TSMC in Taiwan, a single dependency that is probably one of the biggest risks nobody talks about enough.
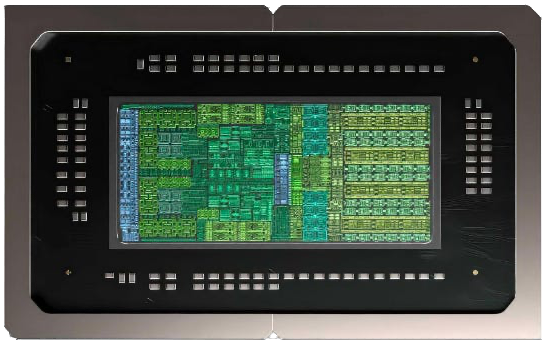
NVIDIA GB10 Superchip powering the DGX Spark

The GB10 Superchip inside NVIDIA’s DGX Spark

It is worth remembering who is actually running NVIDIA, because it explains a lot. Jensen Huang isn’t a finance guy who inherited a chip company, he is a chip guy from the start. He studied electrical engineering at Oregon State and Stanford, then spent years designing microprocessors at AMD and LSI Logic before co-founding NVIDIA in 1993. Thirty years later he’s still CEO, and the company still moves like an engineering shop that happens to be worth trillions, not the other way around.

Apple: distributed AI on device

Apple isn’t trying to beat NVIDIA at building data centers. Instead it leans on something surprisingly good for AI: unified memory. On a Mac with Apple Silicon, the processor, graphics, and AI parts all share one pool of memory, up to 512GB on the biggest Mac Studio. That matters because the real bottleneck in running AI models usually isn’t raw power, it’s having enough memory to hold the model. A consumer NVIDIA card tops out around 24GB; a Mac Studio can be configured with far more, and use all of it directly. Combined with Apple’s own MLX framework and the growing pile of models built for regular computers, a Mac has quietly become one of the best machines for running AI yourself, no cloud, no bill, nothing sent to someone else’s servers.

Apple is not chasing NVIDIA’s training-scale compute. It is following a different strategy: being the place where AI runs, on your own device, for the billions of people who will never touch a data center. It can make that bet because it controls everything, the chip, the OS, and increasingly the models themselves.

That focus on silicon and hardware is not an accident. Tim Cook stepped down in September 2026 after 15 years as CEO, and Apple handed the job to John Ternus, who ran Hardware Engineering. Ternus is a mechanical engineer who’s spent 25 years at Apple building the actual devices, not managing spreadsheets. Putting a hardware guy in charge right as the industry fights over chips and on-device AI is a pretty clear signal of where Apple thinks the next decade gets won.

Two Different Bets, Same Battle

NVIDIA is betting on going big: massive data centers, huge models, compute rented by the hour. Apple is betting on going local: smaller models running on hardware you already own, selling privacy and speed instead of raw power. Neither bet is wrong, they’re just built for different futures, and the likely outcome is both keep growing side by side, heavy training staying in NVIDIA’s data centers while everyday AI, coding assistants, summaries, increasingly runs locally on Apple Silicon or whatever competitors ship in response.

Software Is Dead?

While everyone fights over who runs these models, something strange is happening to the value of the code they produce. Tools like OpenAI’s Codex and Anthropic’s Claude Code can now write, fix, and ship working software from a plain instruction, often faster and with fewer mistakes than a human.

So is software dead? Not really, but what makes someone good at it has changed fast. Typing code was never really the hard part, it just felt that way. These tools are great at producing code that works, but still bad at knowing what to build, why it matters, and what to do when it breaks in the middle of the night, and that judgment has not gotten any cheaper. If anything, checking the work becomes the new bottleneck: when code is nearly free to write, the value shifts to reading it, testing it, and deciding whether to trust it.

The advantage shifts to a higher level. Getting started is also getting much easier, and that’s mostly a good thing: one person can now do what used to take a whole team. But this also means just knowing how to code is not a special career advantage anymore, the same way knowing how to use a spreadsheet stopped being one decades ago. The easy, repetitive parts of coding are getting automated. What is left are the truly hard parts: sofware architecutre, technological knowledge, and understanding what people actually need. Software is not going away only the “just writing the code” part is going away or delegated.

Conclusion

The fight between NVIDIA and Apple is really about two ideas of where AI should live, in giant data centers or on the devices already in our hands, and both will probably keep winning in their own lane for a long while. Meanwhile the tools running on all that hardware are quietly taking over the easy parts of writing software, pushing what makes someone valuable different. Whichever side you are leaning on, the chip in front of you matters more than it used to, and the code running on it is about to matter very differently.

Accelerated DIY & Hack

I wanted a smart lamp shaped like a bunny that shows up in the Hue app next to my real Hue bulbs, changes color, and doesn’t cost 100 CHF. So I built one, and the firmware side took way less time than it should have, thanks to some help from AI. Some of the groundwork came from Zigbee: Hue-llo world! , a great write-up worth reading helped a lot to get into the Zigbee & Hue specifics.

Bunny & Hue ?

No real reason for the bunny, something wich will make a 2 years old girl happy, I just liked the shape and had a cheap plastic bunny lamp shell lying around from.

The Hue part is more interesting. The ecosystem and app are quite nice and very user friendly. Hue bulbs talk Zigbee, a low power wireless protocol a lot of smart home gear speaks, and Hue bridge will happily accept any Zigbee light that talks the right language, not just ones sold by Philips. Make a chip pretend to be a Hue bulb, and the Hue app, Alexa, and everything else just treats it like one.

The cheap hardware

For the brain, an ESP32-H2 dev board . It’s a tiny chip that costs a couple of Francs and, unlike most ESP32 boards, doesn’t even have WiFi. What it does have is native support for the 802.15.4 radio Zigbee runs on, exactly what was needed.

For the light, one of those cheap addressable RGB LED rings you can find for less than 3 CHF, the same kind people use for desk lamps and PC builds. Glue it inside the bunny base, wire three pins to the ESP32-H2, and that’s the whole bill of materials, next to nothing compared to an actual Hue bulb.

Where Claude Code came in

The painful part of projects like this is usually the firmware. Getting a chip to speak Zigbee well enough for a Hue bridge to accept it means digging through cluster definitions, device profiles, and Espressif’s Zigbee SDK docs. Normally that’s a weekend of reading specs, forums and web search and a lot of trials and errors.

This time I just described what I wanted to Claude Code: an ESP32-H2 acting as a Zigbee/HUE RGB light bulb, driving an RGB LED ring, that a Hue bridge would recognize and let me control. It scaffolded the whole ESP-IDF project, wired up the right Zigbee clusters, and wrote the driver code for the LED ring. The first working (bring up) binary was flashed something like 10 min later than the first promtp.

It was not a perfect first try, nothing is with real hardware. Some functionals bugs due to not specifying the hardware setup and components detailled enough and some hickups of claude code’s code generation. Bug, Feedback, let claude interacting directly with the console over usb. A couple of rounds of that, flash, look, describe, fix, and it was working but not pairing cleanly with the Hue bridge like a proper Hue light.

Grabbing the TCL Key

As explained in Wejn’s post and in other sources, the key protecting that handshake is called the Trust Center Link Key, and Philips doesn’t hand it out.

Unlike the plain Zigbee Home Automation profile, which ships a public default link key, Hue uses the older Zigbee Light Link profile, where the link key is a proprietary secret given only to manufacturers who sign an NDA and get certified. That’s exactly why sniffing was the only realistic option, there was no public key to look up.

The join handshake already hands a new device its network key automatically, but I wanted to see that moment happen and reuse the key directly in later builds, instead of redoing the join process on every reflash. So I asked Claude Code for a second, throwaway firmware image that just listens: put the ESP32-H2’s radio into promiscuous mode on the Zigbee channel and dump every raw frame to a PCAP file.

Before writing that sniffer, Claude Code stopped and asked me to confirm this was my own bridge and bulbs, not someone else’s network. Fair enough, a sniffer is a sniffer.

I put an existing Hue bulb into re-pair mode and let the sniffer catch the join handshake over the air. Claude walked me through loading the capture into Wireshark and finding the one packet that mattered, the bridge handing the real network key to the joining device, encrypted under that proprietary link key. From there the Bunny ESP32-H2 could use the recovered key directly and behave like a trusted official device.

The result

The bunny now lives in the Hue app like any other bulb. It can be dimmed, its color changed, put it in a scene, or have it pulse red when an automation fires, all for the price of a “croissant” in parts. The GenAI code what a really time saver, which make such projet much more affordable when you are lacking of precious time.

Email Security

Ensuring Proper Email Security: A Deep Dive into SPF, DKIM, DMARC, and SPF Flattening

Email remains a critical communication tool for businesses and individuals alike. However, it’s also a prime target for cybercriminals who exploit vulnerabilities through phishing, spoofing, and impersonation attacks. To combat these threats, implementing robust email authentication protocols is essential. This blog post provides a comprehensive, detailed guide to setting up Sender Policy Framework (SPF), DomainKeys Identified Mail (DKIM), and Domain-based Message Authentication, Reporting, and Conformance (DMARC). We’ll also include a dedicated subchapter on SPF flattening—a technique to optimize SPF records when they become overly complex. Each section includes step-by-step instructions, code examples, and best practices to help you secure your domain effectively..

Email Authentication Protocols

Email authentication helps verify that messages are sent from legitimate sources, preventing unauthorized use of your domain. SPF checks if the sending server is authorized, DKIM adds a cryptographic signature to ensure message integrity, and DMARC ties them together with policy enforcement and reporting. Together, these protocols can reduce spoofing risks by up to 90%, improve deliverability, and provide visibility into email traffic. Without them, your domain is vulnerable to being impersonated, leading to phishing attacks that could damage your reputation or result in data breaches.

Setting up these protocols involves modifying your domain’s DNS records, typically TXT or CNAME entries. Always test changes in a monitoring mode to avoid disrupting legitimate emails. Tools like online checkers (e.g., for SPF, DKIM, and DMARC) are invaluable for validation.

Sender Policy Framework (SPF)

PF is an email validation system that allows domain owners to specify which IP addresses or servers are permitted to send emails on their behalf. When a receiving server gets an email, it checks the sender’s IP against the domain’s SPF record in DNS. If it matches, the email passes SPF authentication; otherwise, it may be marked as spam or rejected. This helps prevent domain spoofing, where attackers forge the “From” address. SPF works by publishing a TXT record in your DNS that lists authorized mechanisms. Common mechanisms include:

  • ip4 or ip6: Specific IP addresses or ranges.
  • include: References another domain’s SPF record (e.g., for third-party services like Google Workspace).
  • a or mx: Authorizes the domain’s A/AAAA or MX records.
  • Qualifiers: -all (strict fail), ~all (soft fail), or ?all (neutral).

However, SPF has a limit of 10 DNS lookups per record to prevent abuse of DNS resources. Exceeding this can cause a “PermError” and fail authentication entirely.

How to Set Up SPF

Identify All Authorized Senders: Audit every service that sends email from your domain, such as marketing tools (e.g., Mailchimp), CRMs (e.g., Salesforce), or email providers (e.g., Microsoft 365). List their required includes or IPs. Create the SPF Record: Start with v=spf1 and add mechanisms. Keep it under 255 characters if possible, and monitor lookup count. Publish in DNS: Log into your DNS provider (e.g., GoDaddy, Cloudflare). Add a TXT record with: Host: @ (root domain). Value: Your SPF string. TTL: 3600 seconds (1 hour) for quick propagation.

Test and Validate: Use tools like dig TXT yourdomain.com or online SPF checkers to ensure the record is live and syntax is correct. Send test emails and check headers for spf=pass. Monitor and Update: Regularly review for changes in sender IPs or new services.

Basic SPF for a single IP:

v=spf1 ip4:192.168.0.1 -all 

This authorizes only the IP 192.168.0.1 and fails all others.

For multiple services (e.g., icloud):

v=spf1 include:_spf.google.com include:sendgrid.net ~all

This includes Apple’s SPF records with a soft fail qualifier. Note: This counts as 2 lookups initially, but nested includes may add more. Advanced with IPs and MX:

v=spf1 mx ip4:203.0.113.0/24 include:_spf.google.com -all

Authorizes MX records, a specific IP range, and Google, with strict fail.

Best Practies

  • Start with ~all to observe failures without blocking emails.
  • Avoid unnecessary a or mx if they inflate lookups.
  • Use SPF generators and checkers to simulate lookups.
  • Audit quarterly: Remove unused senders to keep under 10 lookups.

DomainKeys Identified Mail (DKIM): Signing Your Messages

DKIM provides a digital signature for emails, verifying that the message hasn’t been tampered with in transit and originates from an authorized sender. It uses asymmetric cryptography: a private key signs the email on the sending server, and the public key is published in DNS for recipients to verify. Unlike SPF, which checks the envelope sender, DKIM focuses on the message content and headers.

  • Selector: A unique identifier (e.g., default) for the key pair.
  • Public Key: Published as a TXT record under selector._domainkey.yourdomain.com.
  • Signature: Added to email headers (e.g., DKIM-Signature).

DKIM is resilient to forwarding but can break if intermediaries alter signed headers.

Setup DKIM

  • Generate Key Pair: Use your email service provider’s tools (e.g., in Google Workspace: Admin > Apps > Google Workspace > Gmail > Authenticate email). The provider generates the keys and provides the public key TXT value.
  • Publish the Public Key in DNS: Add a TXT or CNAME record.
  • Enable Signing: Activate DKIM in your email platform to start signing outgoing messages.
  • Test: Send an email and inspect headers for dkim=pass. Use tools like mail-tester.com.
  • Rotate Keys: Change keys annually or after a compromise.

Example DKIM TXT Record:

v=DKIM1; k=rsa; p=MIGfMA0GCSqGSIb3DQEBAQUAA4GNADCBiQKBgQDnVgd0NyrRE261IIiPqi+0H1baNyKcdj8Kea/VlSP4exzvKx8pJ01EWMwd094FV/6OCBIf7KGKgowMnWl3tW3Z5G++uZHkdgF+6xg7b9PynmX/NTo2kx92hlGgegwyulF5B7d2FM0doaCeoO4rD05jZzwi3cXx/156Gg9Xwd/Z/QIDAQAB

Host: default._domainkey (for selector default). For services like SendGrid (using CNAME for delegation):

Type: CNAME
Host: s1._domainkey
Value: s1.domainkey.u123456.wl.sendgrid.net

This delegates signing to SendGrid. Example Email Header with DKIM Signature:

DKIM-Signature: v=1; a=rsa-sha256; c=relaxed/relaxed; d=yourdomain.com; s=default; h=from:to:subject:date; bh=2jUSOH9NhtVGCQWNr9BrIAPreKQjO6Sn7XIkfJVOzv8=; b=AuUoFEfDxTDkHlLXSZEpVj79LICEps6eda7W3deTVFOk4yAUoqOB4nujc7YopdG5 dHwxs4yRUESOrqN4hXQDgQBWKGXn4vcoD9hGf6Y6Uv5KevhgXKvc4OH60z5vJpkHH uCiNMBBjqpTHYy2hXzrQ==

This signs specific headers and the body hash.

Best Practices

  • Use 2048-bit RSA keys for security.
  • Sign critical headers like From, To, Subject.
  • Align the DKIM domain with the From header for DMARC compatibility.
  • If using multiple selectors, rotate them for different services.

Domain-based Message Authentication, Reporting, and Conformance (DMARC): Enforcing and Reporting

DMARC builds on SPF and DKIM by specifying what to do with emails that fail authentication. It requires “alignment” (SPF/DKIM domains matching the From header) and provides policies: none (monitor), quarantine (spam), or reject (block). Additionally, it sends aggregate (rua) and forensic (ruf) reports to help monitor abuse. DMARC protects against exact-domain spoofing and improves visibility—over 80% of domains without it are at risk.

  • p: Policy (none/quarantine/reject).
  • rua: Aggregate reports email.
  • ruf: Forensic reports (detailed failures).
  • pct: Percentage of emails to apply policy (e.g., 100).

Setup DMARC

  • Prerequisite: Ensure SPF and DKIM are set up and passing.
  • Create the Record: Start with monitoring mode.
  • Publish in DNS: TXT record at _dmarc.yourdomain.com.
  • Monitor Reports: Set up emails for rua/ruf (use a service to aggregate if volume is high).
  • Enforce Gradually: Move to quarantine (e.g., after 1-2 weeks), then reject.
  • Handle Subdomains: Use sp tag for subdomain policy.

SPF Flattening – Optimizing Complex Records

SPF flattening is a technique to resolve the 10 DNS lookup limit by replacing include: mechanisms with their underlying IP addresses or ranges. Instead of nested lookups (e.g., including _spf.google.com which itself has lookups), you “flatten” the record into a direct list of IPs. This reduces lookups to 1 (your record) but can make the record lengthy. It’s a workaround for domains with many third-party senders, preventing “Too Many DNS Lookups” errors that cause SPF failures. For example, a nested record might exceed limits, leading to rejections. Flattening compiles all IPs into one flat entry.

Why is SPF Flattening Needed?

The SPF standard (RFC 7208) caps lookups at 10 to avoid DNS overload. With multiple services (e.g., Google, Microsoft, CRM tools), includes can chain and exceed this, breaking authentication. Flattening eliminates nested lookups, ensuring compliance. It’s relevant for complex setups but not ideal long-term due to maintenance issues.

  • Audit Your Record: List all includes and resolve them to IPs using tools like dig or SPF flatteners.
  • Resolve IPs: For each include, fetch the IPs (e.g., dig TXT _spf.google.com).
  • Remove Duplicates and Consolidate: Merge overlapping ranges (e.g., use CIDR notation).
  • Create Flat Record: Replace includes with ip4: or ip6:.
  • Publish and Test: Update DNS and verify no lookups exceed 10.
  • Automate if Possible: Use services that monitor and auto-update for IP changes.

Manual implementation is error-prone; prefer automated tools.

Before Flattening (Nested, potentially over limit):

v=spf1 include:_spf.google.com include:sendgrid.net include:mail.zendesk.com -all

This could involve 15+ lookups if nested.

After Flattening (Flat IPs):

v=spf1 ip4:66.249.64.0/19 ip4:173.194.0.0/16 ip4:209.85.128.0/17 ip4:198.51.100.0/24 ip6:2607:f8b0:4004::/48 -all

This lists Google’s and others’ IPs directly, with 0 additional lookups.

Pros and Cons

Pros:

  • Bypasses lookup limit, preventing errors.
  • Simplifies resolution for receivers.
  • Auto-services can handle updates.

Cons:

  • IPs change frequently (e.g., providers add/remove them), requiring constant updates—manual flattening can lead to outdated records and bounced emails.
  • Loses traceability: Hard to know which IPs belong to which service.
  • Increases record size, risking DNS limits (e.g., 512 bytes UDP).
  • High maintenance; errors in IPs or syntax can invalidate everything.
  • Not scalable; adds fragility.

Use flattening only if you exceed 10 lookups and can’t optimize otherwise—e.g., with 15+ senders. Avoid it by:

  • Removing redundant/duplicates or non-essential mechanisms (e.g., drop a/mx if unnecessary).
  • Using subdomains for services (e.g., marketing.yourdomain.com with its own SPF).
  • Auditing with DMARC reports to eliminate unused senders.
  • Segmenting: Create separate records for different email types.

Tools like SPF flatteners or DMARC analyzers can help monitor without flattening.

Conclusion: Securing Your Email Ecosystem

Implementing SPF, DKIM, and DMARC is a foundational step in email security, protecting against impersonation while boosting deliverability. Start with SPF and DKIM, then layer on DMARC for enforcement. For complex SPF setups, consider flattening cautiously, but prioritize optimization to avoid its pitfalls. Regular audits, testing, and monitoring reports will keep your configuration robust. By following these detailed steps, you can significantly reduce risks and ensure your emails reach the inbox securely. If you’re managing multiple domains, consider professional services for ongoing maintenance.

Loading more posts…